RadSideDrawer入門
この記事では、NativeScriptアプリケーションのページにRadSideDrawerインスタンスを追加し、 そのコンテンツを初期化するプロセスについて説明します。 このセクションのサンプルコードは、スタンドアロンのデモアプリケーションとして利用できます。
RadSideDrawerは、Pageの唯一の子要素として配置されるように設計されています。例:
<Page>
	<!-- RadSideDrawer should be either the absolute root element (instead Page) or a single child of the Page -->
	<RadSideDrawer>
		<!-- drawer menu and content follows here-->
	</RadSideDrawer>
	<!-- <StackLayout></StackLayout>  NOT Allowed! (can't have other layouts on the same level the drawer)-->
</Page>
インストール
次のコマンドを実行して、プラグインをアプリケーションに追加します。
ページにRadSideDrawerを追加する
アプリケーションのページにRadSideDrawerインスタンスを追加するには、次のXML名前空間を定義する必要があります。
xmlns:nsDrawer="nativescript-ui-sidedrawer"
ここでの名前空間はnsDrawerと呼ばれます。
これにより、XMLページでRadSideDrawerのAPIにアクセスできます。
RadSideDrawerのインスタンスの追加方法は、次の通りです。
<nsDrawer:RadSideDrawer id="sideDrawer">
	<nsDrawer:RadSideDrawer.drawerContent>
		<GridLayout rows="56, *" backgroundColor="gray">
			<StackLayout class="headerContent">
				<Label text="Navigation Menu"/>
			</StackLayout>
			<ScrollView row="1">
				<StackLayout>
					<Label text="Primary" padding="10" backgroundColor="lightgray"/>
					<Label text="Social" padding="10"/>
					<Label text="Promotions" padding="10" />
					<Label text="Labels" padding="10" backgroundcolor="lightgray" backgroundColor="transparent" />
					<Label text="Important" padding="10" />
					<Label text="Starred" padding="10" />
					<Label text="Sent Mail" padding="10" />
					<Label text="Drafts" padding="10" />
					<Label text="Close Drawer" color="lightgray" padding="10" style="horizontal-align: center" tap="{{ onCloseDrawerTap }}"/>
				</StackLayout>
			</ScrollView>
		</GridLayout>
	</nsDrawer:RadSideDrawer.drawerContent>

	<nsDrawer:RadSideDrawer.mainContent>
		<StackLayout >
			<Label text="{{ mainContentText }}" textWrap="true" fontSize="13" padding="10" />
			<Button text="Open drawer" tap="{{ onOpenDrawerTap }}" margin="10" style="horizontal-align: left" />
		</StackLayout>
	</nsDrawer:RadSideDrawer.mainContent>
</nsDrawer:RadSideDrawer>
import { GettingStartedViewModel } from "./getting-started-model";
import { Page } from "tns-core-modules/ui/page";
export function pageLoaded(args) {
let page = args.object as Page;
page.bindingContext = new GettingStartedViewModel();
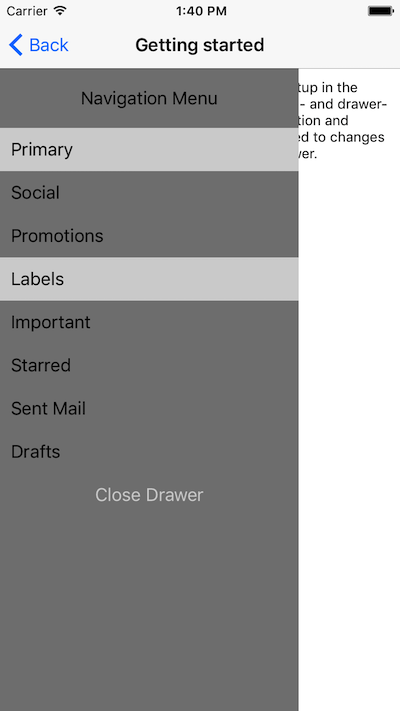
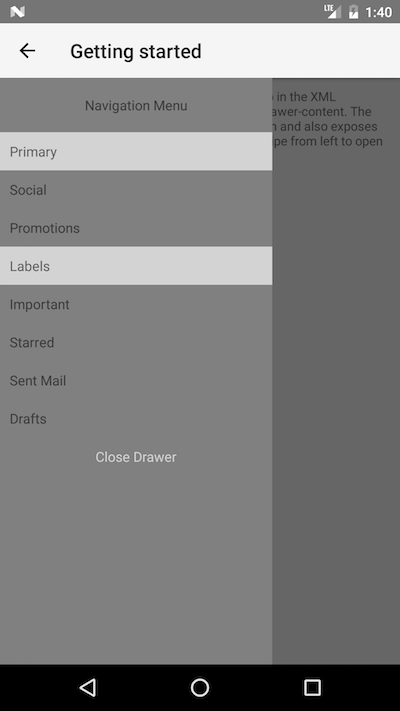
}ご覧のとおり、"mainContent" および"drawerContent"プロパティは、 コンテンツがにどのようにRadSideDrawerに設定されているかを示すために、一連のUI要素で初期化されています。 サンプルコードのバインディングとイベントハンドラーは、次のセクションにあります。
"drawerContent"および"mainContent"内の要素にプロパティをバインドする
そのため、内部のView要素上のプロパティを、bindingContextの後ろにあるオブジェクトによって公開されているプロパティにバインドすることができます。
上記のXMLコードを考慮して、バインディングコンテキストとして使用するビューモデルのサンプルコードを以下に示します。
import { Observable } from "tns-core-modules/data/observable";
import { Frame } from "tns-core-modules/ui/frame";
import { RadSideDrawer } from "nativescript-ui-sidedrawer";

export class GettingStartedViewModel extends Observable {
    constructor() {
        super();
        this.set("mainContentText", "SideDrawer for NativeScript can be easily setup in the XML definition of your page by defining main- and drawer-content. The component"
            + " has a default transition and position and also exposes notifications related to changes in its state. Swipe from left to open side drawer.");
    }

    public onOpenDrawerTap() {
        let sideDrawer: RadSideDrawer = <RadSideDrawer>(Frame.topmost().getViewById("sideDrawer"));
        sideDrawer.showDrawer();
    }

    public onCloseDrawerTap() {
        let sideDrawer: RadSideDrawer = <RadSideDrawer>(Frame.topmost().getViewById("sideDrawer"));
        sideDrawer.closeDrawer();
    }
}
次のスクリーンショットは、その場合のドロワーの外観を示しています。
図1. RadSideDrawerの「tkMainContent」

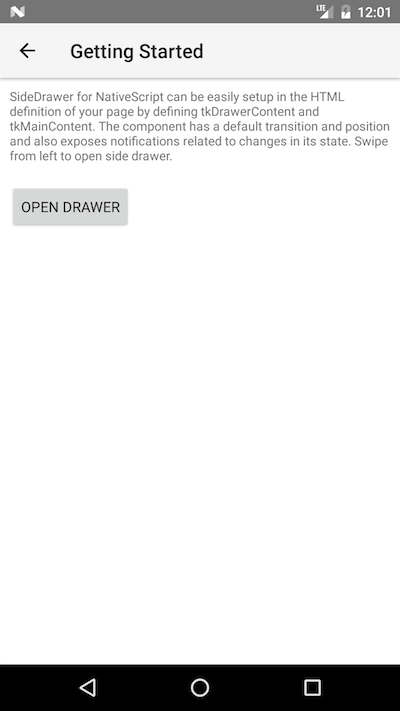
図2. RadSideDrawerの「tkDrawerContent」
参考文献
このシナリオの実際を見たいですか? GitHubでSDKサンプルリポジトリを確認してください。 NativeScript UIを使用した、これと他の多くの実用的な例があります。
役立つと思われる関連記事: