RadListViewアイテムのテンプレート
デフォルトで"RadListView"は、データソースからのアイテムを視覚化するためにを使用する場合、 必要なことは、独自の"itemTemplate"を宣言し、それを目的のUIビューに設定することだけです。 これにより、"items"プロパティに渡された各ビジネスオブジェクトが そのテンプレートを使用して視覚化されることが確実になりますが、特定のビジネスオブジェクト(異なるセクション、重要なビジネスオブジェクト、より詳細なオブジェクトなど)に異なるテンプレートを使用したい場合があります。 このようなシナリオでは、"itemTemplates"を使用できます。
複数のアイテムテンプレートの使用
アイテム表現に異なるテンプレートを使用するようにRadListViewを設定するには、次のことを行う必要があります。
- 関数を作成するか、各ビジネスオブジェクトのテンプレートを決定する「プロパティ」の文字列表現を渡します。 これは、"itemTemplateSelector"プロパティを設定することによって行われます
- 複数の個別のtemplateを作成し、 それらを"itemTemplates"コレクションプロパティに追加して、 目的の一意のテンプレート識別子にkeyを設定します。 このkeyは、 "itemTemplateSelector"の比較に使用されます。
例1:itemTemplateSelector と itemTemplates のセットアップ
以下のコードスニペットでは、XMLで複数の<template></template>インスタンスを宣言し、 それらをRadListView.itemTemplatesに設定しています。 その後、アイテム表現のテンプレートを決定するために使用されるビジネスオブジェクトのプロパティを返す関数をbindingContextに作成し、最後にその関数を "itemTemplateSelector" プロパティにバインドします。
<lv:RadListView items="{{ dataItems }}" itemTemplateSelector="{{ templateSelector }}" groupingFunction="{{ myGroupingFunc }}">
	<lv:RadListView.itemTemplate>
		<StackLayout orientation="vertical">
			<Label fontSize="20" text="{{ itemName }}" margin="5"/>
			<Label fontSize="17" text="{{ type }}" margin="0 5 0 5"/>
			<Label fontSize="14" text="{{ itemDescription }}" margin="5"/>
		</StackLayout>
	</lv:RadListView.itemTemplate>

	<lv:RadListView.itemTemplates>
		<template key="first">
			<StackLayout orientation="vertical" style.backgroundColor="black">
				<Label fontSize="20" text="{{ itemName }}" color="yellow" margin="5"/>
				<Label fontSize="17" text="{{ type }}" color="yellow" margin="0 5 0 5"/>
				<Label fontSize="14" text="{{ itemDescription }}" color="yellow" margin="5"/>
			</StackLayout>
		</template>
		<template key="Red">
			<StackLayout orientation="vertical" style.backgroundColor="red">
				<Label fontSize="20" text="{{ itemName }}" color="white" margin="5"/>
				<Label fontSize="17" text="{{ type }}" color="white" margin="5"/>
			</StackLayout>
		</template>
		<template key="green">
			<StackLayout orientation="vertical" style.backgroundColor="green">
				<Label fontSize="20" text="{{ itemName }}" color="white" margin="5"/>
				<Label fontSize="17" text="{{ type }}" color="white" margin="5"/>
			</StackLayout>
		</template>
		<template key="Blue">
			<StackLayout orientation="vertical" style.backgroundColor="blue">
				<Label fontSize="20" text="{{ itemName }}" color="white" margin="5"/>
				<Label fontSize="17" text="{{ type }}" color="white" margin="5"/>
			</StackLayout>
		</template>
		<template key="last">
			<StackLayout orientation="vertical" style.backgroundColor="yellow">
				<Label fontSize="20" text="{{ itemName }}" color="black" margin="5"/>
				<Label fontSize="17" text="{{ type }}" color="black" margin="0 5 0 5"/>
				<Label fontSize="14" text="{{ itemDescription }}" color="black" margin="5"/>
			</StackLayout>
		</template>
	</lv:RadListView.itemTemplates>
</lv:RadListView>
export function onPageLoaded(args) {
let page = args.object;
page.bindingContext = new ViewModel();
}import { ObservableArray } from "tns-core-modules/data/observable-array";
import { Observable } from "tns-core-modules/data/observable";
export class ViewModel extends Observable {
constructor() {
super();
this.dataItems = new ObservableArray<DataItem>();
this._templateSelector = this.templateSelectorFunction;
let itemsCount = 50;
for (let i = 0; i <= itemsCount; i++) {
this.dataItems.push(new DataItem(i, "Item " + i, "This is item description", this.getType(i, itemsCount)));
}
}
get myGroupingFunc(): (item: any) => any {
return (item: DataItem) => {
return item.type;
};
}
get dataItems(): ObservableArray<DataItem> {
return this.get("_dataItems");
}
set dataItems(value: ObservableArray<DataItem>) {
this.set("_dataItems", value);
}
get _templateSelector(): (item: DataItem, index: number, items: any) => string {
return this.get("templateSelector");
}
set _templateSelector(value: (item: DataItem, index: number, items: any) => string) {
this.set("templateSelector", value);
}
public templateSelectorFunction = (item: DataItem, index: number, items: any) => {
return item.type;
}
private getType(index: number, end: number): string {
let lastDigit = index % 10;
let type = index === 0 ? "first" : index === end ? "last" : undefined;
if (!type) {
type = lastDigit === 0 ? "default" : lastDigit <= 3 ? "red" : lastDigit <= 6 ? "blue" : lastDigit <= 9 ? "green" : "default";
}
return type;
}
}
export class DataItem {
public id: number;
public itemName;
public itemDescription;
constructor(id: number, name: string, description: string, public type: string) {
this.id = id;
this.itemName = name;
this.itemDescription = description;
}
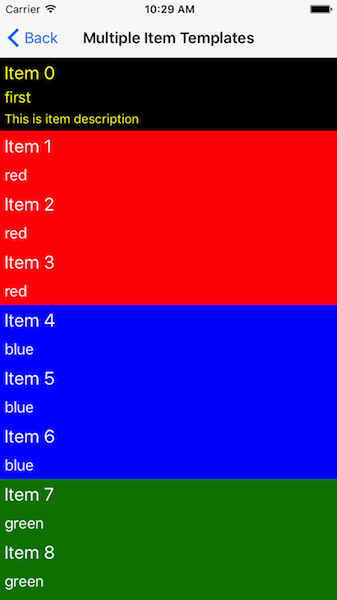
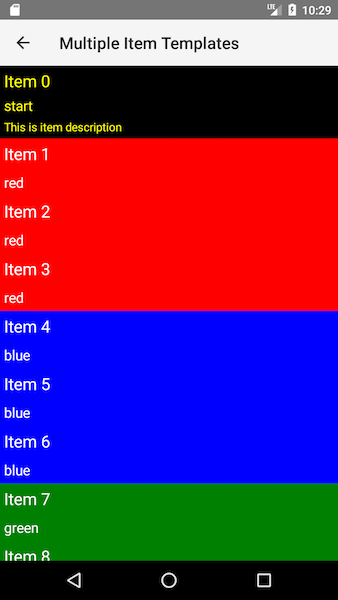
}図1:複数のアイテムテンプレートを持つRadListView:
参考文献
このシナリオを実際に見てみたいですか? GitHubのSDKサンプルリポジトリを確認してください。これとNativeScript UIを使用した他の多くの実用的な例があります。