RadListView入門
この記事では、アプリケーションにRadListViewを追加し、それをデータソースにバインドし、選択したアイテムテンプレートを使用してアイテムを視覚化するプロセスについて説明します。 RadListViewの個別の機能の使用方法の詳細については、同じシナリオを使用している詳細な記事を参照してください。 このセクションのサンプルコードは、スタンドアロンのデモアプリケーションとして利用できます。
導入
次のコマンドを実行して、プラグインをアプリケーションに追加します。
RadListViewをページに追加する
"RadListView"アプリケーションのページにインスタンスを追加するには、 次のXML名前空間を定義する必要があります。
xmlns:lv="nativescript-ui-listview"
その後、次のXML構成を使用してRadListViewをページに配置できます。
例1:RadListViewをページに追加する
<navigation:ExamplePage xmlns:navigation="navigation/example-page" loaded="onPageLoaded" xmlns:lv="nativescript-ui-listview" xmlns="http://www.nativescript.org/tns.xsd">
	<lv:RadListView items="{{ dataItems }}" >
		<lv:RadListView.itemTemplate>
			<StackLayout orientation="vertical">
				<Label fontSize="20" text="{{ itemName }}"/>
				<Label fontSize="14" text="{{ itemDescription }}"/>
			</StackLayout>
		</lv:RadListView.itemTemplate>
	</lv:RadListView>
</navigation:ExamplePage>
これにより、線形レイアウトで新しいRadListViewインスタンスが初期化され、ページの直接の子として配置されます。
次に、アイテムのリストをソースとして準備し、それらをRadListViewに渡します。 ページのバインディングコンテキストになり、コントロールの設定に使用するオブジェクトのコレクションを公開するビューモデルを作成してみましょう。 view-model アプリケーションで呼び出される新しいファイルを作成し、次のコードを貼り付けます。
例2:RadListViewにデータを供給するために使用されるモデルの作成
import { ObservableArray } from "tns-core-modules/data/observable-array";
import { Observable } from "tns-core-modules/data/observable";

export class ViewModel extends Observable {

    constructor() {
        super();
        this.dataItems = new ObservableArray<DataItem>();

        for (let i = 0; i < 10; i++) {
            this.dataItems.push(new DataItem(i, "Item " + i, "This is item description."));
        }
    }

    get dataItems(): ObservableArray<DataItem> {
        return this.get("_dataItems");
    }

    set dataItems(value: ObservableArray<DataItem>) {
        this.set("_dataItems", value);
    }
}

export class DataItem {
    public id: number;
    public itemName;
    public itemDescription;

    constructor(id: number, name: string, description: string) {
        this.id = id;
        this.itemName = name;
        this.itemDescription = description;
    }
}これで、ページのバインディングコンテキストを提供するために、次のようにpageLoadedイベントを使用して、 ビューモデルのインスタンスをbindingContextページのプロパティに割り当てることができます。
例3:RadListViewページへのバインディングコンテキストの割り当て
import { ViewModel } from "./getting-started-model";
export function onPageLoaded(args) {
	const page = args.object;
	page.bindingContext = new ViewModel();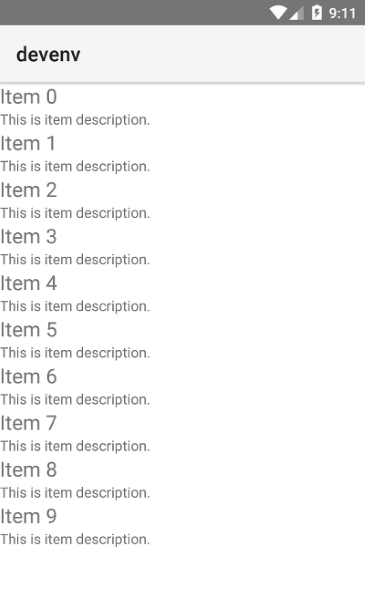
}アプリケーションをビルドして実行すると、次の結果が生成されます。
図1:NativeScriptのRadListViewの概要

参考文献
このシナリオを実際に見てみたいですか? GitHubのSDKサンプルリポジトリを確認してください。これ以外にもNativeScript UIを使用した他の多くの実用的なサンプルがあります。
役立つと思われる関連記事: